

在现有的华为 k8s集群上部署k8s中间件和imom系统
1. 使用场景背景
- 项目现场已部署完华为方案的k8s以及华为mbm;
- 项目现场需要在此基础上安装imom系统;
2. 相关宿主机(举例)
| 宿主机 | IP | 备注 |
|---|---|---|
| nfs服务 | 192.168.1.2 | 需要安装好nfs-server服务 |
| k8s master1 | 192.168.1.1 | 华为方案的k8s master1 |
| docker registry | 192.168.1.3 | 镜像仓库, 建议是独立的一台机器 |
| 部署机器 | 192.168.1.4 | 需要安装好docker, 建议是独立的一台机器 |
| mysql8.0服务 | 192.168.1.5 | 需要安装好mysql8.0, 建议是独立的一台机器 |
nfs服务安装(192.168.1.2执行):
# centos7.9 安装nfs
yum install -y nfs-utils rpcbind

systemctl enable --now rpcbind
systemctl enable --now nfs-server

firewall-cmd --permanent --add-service=nfs
firewall-cmd --permanent --add-service=rpc-bind
firewall-cmd --permanent --add-service=mountd
firewall-cmd --reload
配置nfs目录(192.168.1.2执行):
# vi /etc/exports
# 添加一行
/var/data/nfs/ *(insecure,rw,sync,no_root_squash)
重启nfs服务(192.168.1.2执行):
systemctl restart nfs-server
若部署机器(192.168.1.4)没有安装docker, 按以下的命令在线安装docker:
curl -fsSL https://get.docker.com | bash -s docker --mirror Aliyun
2. 自动化安装包准备
在测试环境的镜像仓库服务器上(192.168.100.133) 下拷贝ansible_root 安装包到正式环境的部署机器(192.168.1.4) 的/root 目录下。
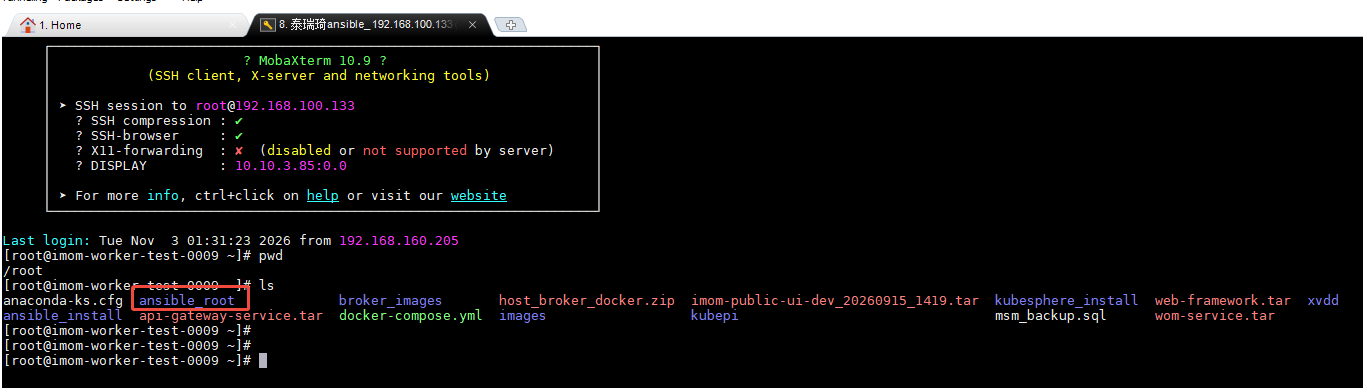
修改/root/ansible_root/host.ini配置下的k8s_master配置:
[root@imom-worker-test-0009 ansible_root]# cat /root/ansible_root/host.ini
# hosts.ini
[host_broker_nfs]
192.168.1.2

[host_broker_mysql]
192.168.100.130

[host_broker_mysql_hw]


[host_broker_docker_registry]
192.168.1.3

[host_broker_nexus3]


[host_kk]
192.168.100.133

[k8s_master]
192.168.1.1

# 密码不能使用#这个特殊字符
[k8s_node]


[host_monitor]


[all:vars]
ansible_user=root
ansible_ssh_pass=你的root登录密码
修改/root/ansible_root/vars/k8s_app.yml, TODO的地方都需要修改:
# host 主机系统 centos79 或 rocky97
os: "rocky97"
# k8s app, 中间件安装环境配置
imom_namespace: "imom"
imom_common_namespace: "common"
imom_elk_namespace: "elk"
imom_monitor_namespace: "monitor"
imom_disable_elk: "1"
imom_disable_monitor: "1"
hw_namespace: "mbm"
image_pull_secrets: "default-secret"
default_secrets_content: ""
default_storage_class: "nfs-client"
external_base_url: "http://TODO_MASTER1_IP:32555"
imom_gateway_host: "TODO_MASTER1_IP:32556"

enable_imom_apps: "imom-gateway,imom-kernel,imom-public-ui"
docker_registry_address: "TODO_IP:5000"
nfs_address: "TODO_IP"
# 废弃, 不用填写
nexus3_address: "192.168.1.105:8081"

mysql_common_port: "3306"
mysql_address: "TODO_IP"
mysql_user: "root"
mysql_password: "TODO输入密码"

redis_address: "sie-redis-broker.{{ imom_common_namespace }}"
redis_master_address: "haproxy-redis-svc.{{ imom_common_namespace }}"
redis_password: "Dme123456"
redis_mode: "SENTINEL"

minio_address: "sie-minio-broker.{{ imom_common_namespace }}"
minio_user: "admin"
minio_password: "Minio123456"

powerjob_address: "powerjob-svc.{{ imom_common_namespace }}"
3. 基础准备
- 安装好镜像仓库
- 安装好nfs-client 存储类,并设置为默认存储类
- 每个k8s工作节点安装好nfs-utils, 并配置containerd对内网镜像仓库走http协议。
3.1 镜像仓库
已安装好docker-registry
3.2 安装nfs相关
获取k8s正式环境所有的工作节点:
[root@imom-worker-test-0009 ~]# kubectl  get nodes -o wide | grep worker | grep -v dmz

imom-worker-test-0001      Ready    <none>          84d   v1.28.0   192.168.100.125   <none>        CentOS Linux 7 (Core)   3.10.0-1160.el7.x86_64   containerd://1.6.33
imom-worker-test-0002      Ready    <none>          84d   v1.28.0   192.168.100.126   <none>        CentOS Linux 7 (Core)   3.10.0-1160.el7.x86_64   containerd://1.6.33
imom-worker-test-0003      Ready    <none>          84d   v1.28.0   192.168.100.127   <none>        CentOS Linux 7 (Core)   3.10.0-1160.el7.x86_64   containerd://1.6.33
imom-worker-test-0004      Ready    <none>          84d   v1.28.0   192.168.100.128   <none>        CentOS Linux 7 (Core)   3.10.0-1160.el7.x86_64   containerd://1.6.33
imom-worker-test-0005      Ready    <none>          84d   v1.28.0   192.168.100.129   <none>        CentOS Linux 7 (Core)   3.10.0-1160.el7.x86_64   containerd://1.6.33
imom-worker-test-0006      Ready    <none>          84d   v1.28.0   192.168.100.130   <none>        CentOS Linux 7 (Core)   3.10.0-1160.el7.x86_64   containerd://1.6.33
imom-worker-test-0007      Ready    <none>          84d   v1.28.0   192.168.100.131   <none>        CentOS Linux 7 (Core)   3.10.0-1160.el7.x86_64   containerd://1.6.33
imom-worker-test-0008      Ready    <none>          84d   v1.28.0   192.168.100.132   <none>        CentOS Linux 7 (Core)   3.10.0-1160.el7.x86_64   containerd://1.6.33
imom-worker-test-0009      Ready    <none>          84d   v1.28.0   192.168.100.133   <none>        CentOS Linux 7 (Core)   3.10.0-1160.el7.x86_64   containerd://1.6.33
imom-worker-test-0010      Ready    <none>          49d   v1.28.0   192.168.100.134   <none>        CentOS Linux 7 (Core)   3.10.0-1160.el7.x86_64   containerd://1.6.33
imom-worker-test-0011      Ready    worker          49d   v1.28.0   192.168.100.135   <none>        CentOS Linux 7 (Core)   3.10.0-1160.el7.x86_64   containerd://1.6.33
mbm-worker-test-0001       Ready    <none>          90d   v1.28.0   192.168.100.116   <none>        CentOS Linux 7 (Core)   3.10.0-1160.el7.x86_64   containerd://1.6.33
mbm-worker-test-0002       Ready    <none>          90d   v1.28.0   192.168.100.117   <none>        CentOS Linux 7 (Core)   3.10.0-1160.el7.x86_64   containerd://1.6.33
mbm-worker-test-0003       Ready    <none>          90d   v1.28.0   192.168.100.118   <none>        CentOS Linux 7 (Core)   3.10.0-1160.el7.x86_64   containerd://1.6.33
mbm-worker-test-0004       Ready    <none>          90d   v1.28.0   192.168.100.119   <none>        CentOS Linux 7 (Core)   3.10.0-1160.el7.x86_64   containerd://1.6.33
mbm-worker-test-0005       Ready    <none>          90d   v1.28.0   192.168.100.120   <none>        CentOS Linux 7 (Core)   3.10.0-1160.el7.x86_64   containerd://1.6.33
mbm-worker-test-0006       Ready    <none>          90d   v1.28.0   192.168.100.121   <none>        CentOS Linux 7 (Core)   3.10.0-1160.el7.x86_64   containerd://1.6.33
mbm-worker-test-0007       Ready    <none>          90d   v1.28.0   192.168.100.122   <none>        CentOS Linux 7 (Core)   3.10.0-1160.el7.x86_64   containerd://1.6.33
ssh进入上述的所有k8s工作节点执行以下操作:
安装nfs客户端组件:
yum install -y nfs-utils
配置 containerd 对内网镜像仓库走 http 协议: vi /etc/containerd/config.toml +156
    149       [plugins."io.containerd.grpc.v1.cri".registry.auths]
    150
    151       [plugins."io.containerd.grpc.v1.cri".registry.configs]
    152
    153       [plugins."io.containerd.grpc.v1.cri".registry.headers]
    154
    155       [plugins."io.containerd.grpc.v1.cri".registry.mirrors]
    156         [plugins."io.containerd.grpc.v1.cri".registry.mirrors."192.168.1.3:5000"]
    157           endpoint = ["http://192.168.1.3:5000"]
    158
执行重启containerd:
systemctl restart containerd
3.3 安装k8s storageClass, 并设置为默认存储类
以下在部署机器(192.168.1.4)上执行:
cd /root/ansible_root/
./auto.sh k8s_app_broker nfs_client
4. 安装imom相关k8s中间件
以下在部署机器(192.168.1.4)上执行:
cd /root/ansible_root/
# 部署imom业务依赖的中间件
./auto.sh k8s_app_broker minio
./auto.sh k8s_app_broker powerjob
./auto.sh k8s_app_broker kkfileview
./auto.sh k8s_app_broker redis
5. 手动安装imom微服务
在现有的测试环境(imom命名空间), 导出imom的deployment, svc, cm 等k8s部署配置:
kubectl get deployments -n imom -o yaml > imom-deployments.yaml
kubectl get svc -n imom -o yaml > imom-svcs.yaml
kubectl get cm -n imom -o yaml > imom-cms.yaml
按以下的方式修改导出的imom-deployments.yaml:
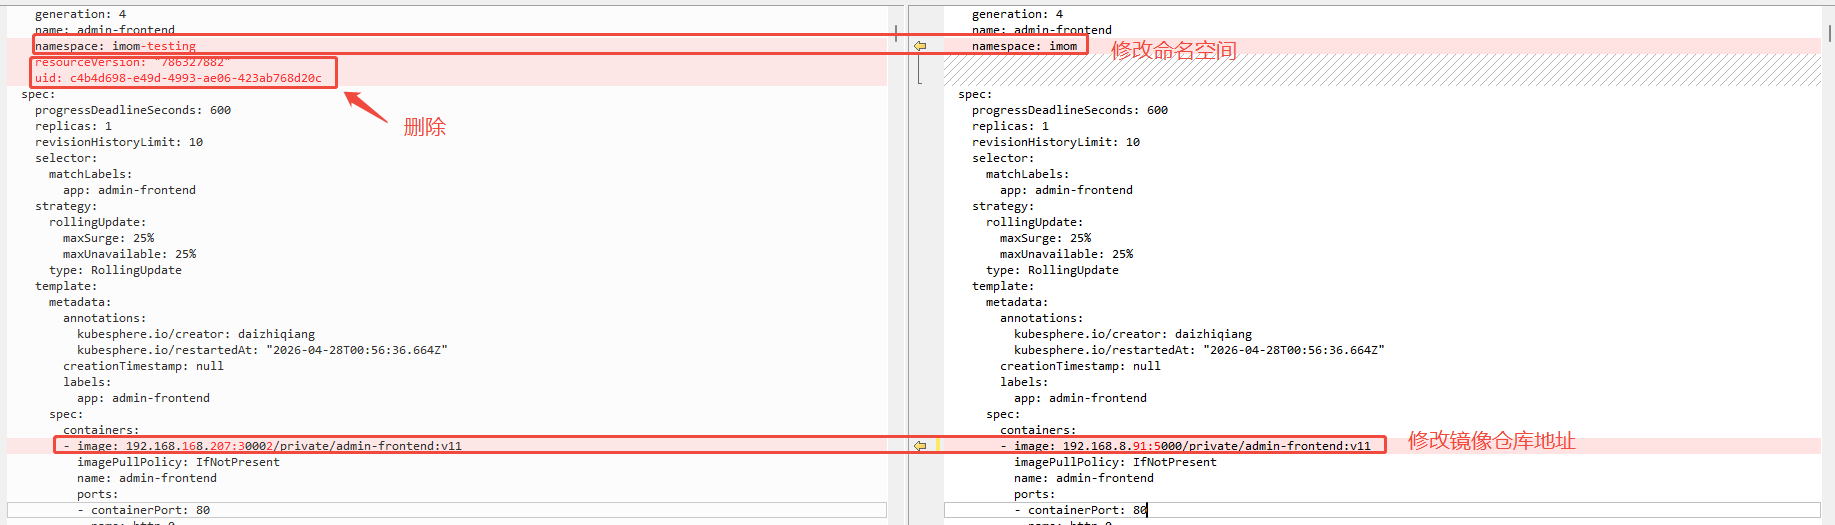
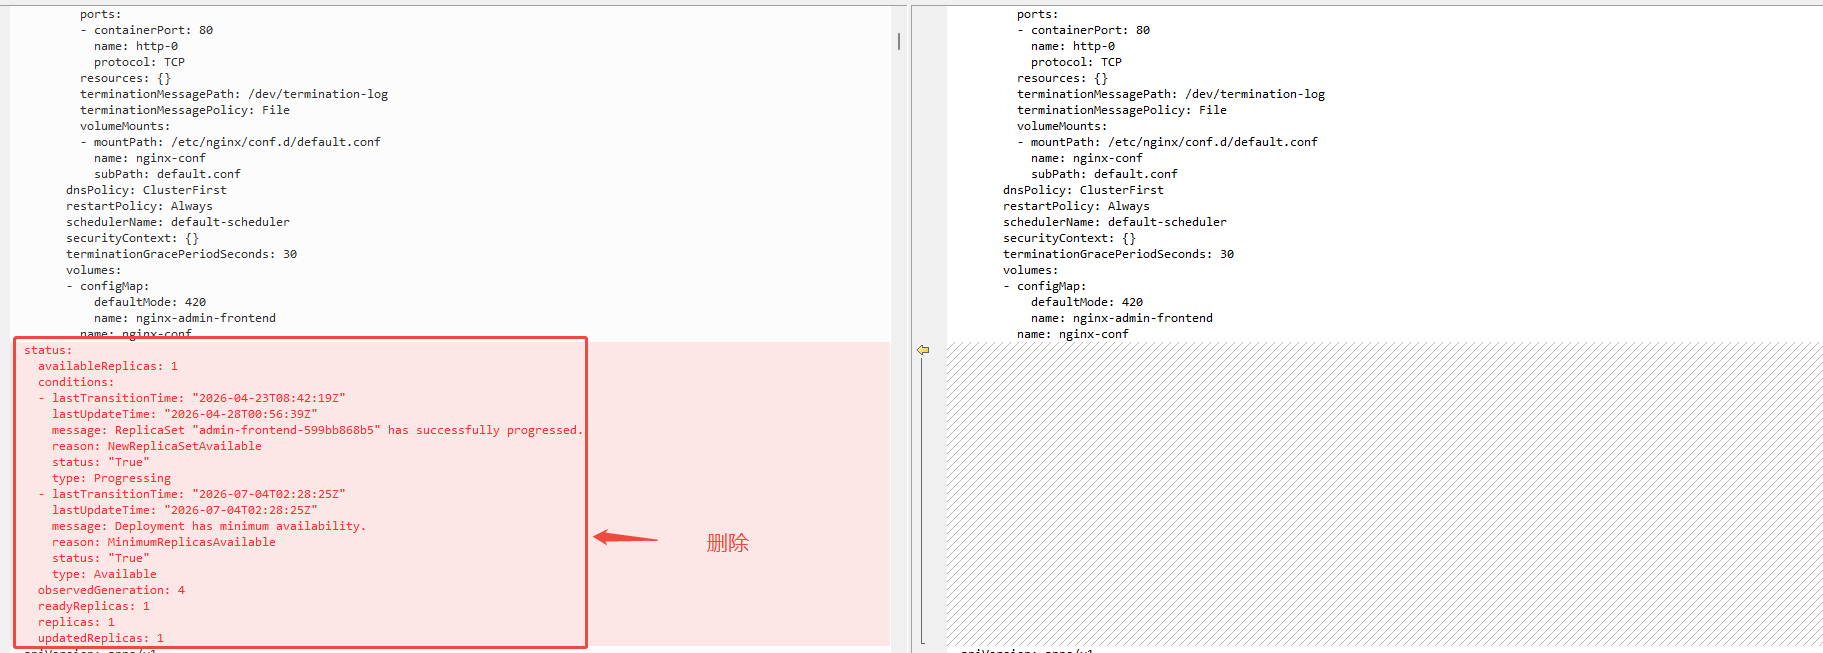
按以下的方式修改导出的imom-svcs.yaml:
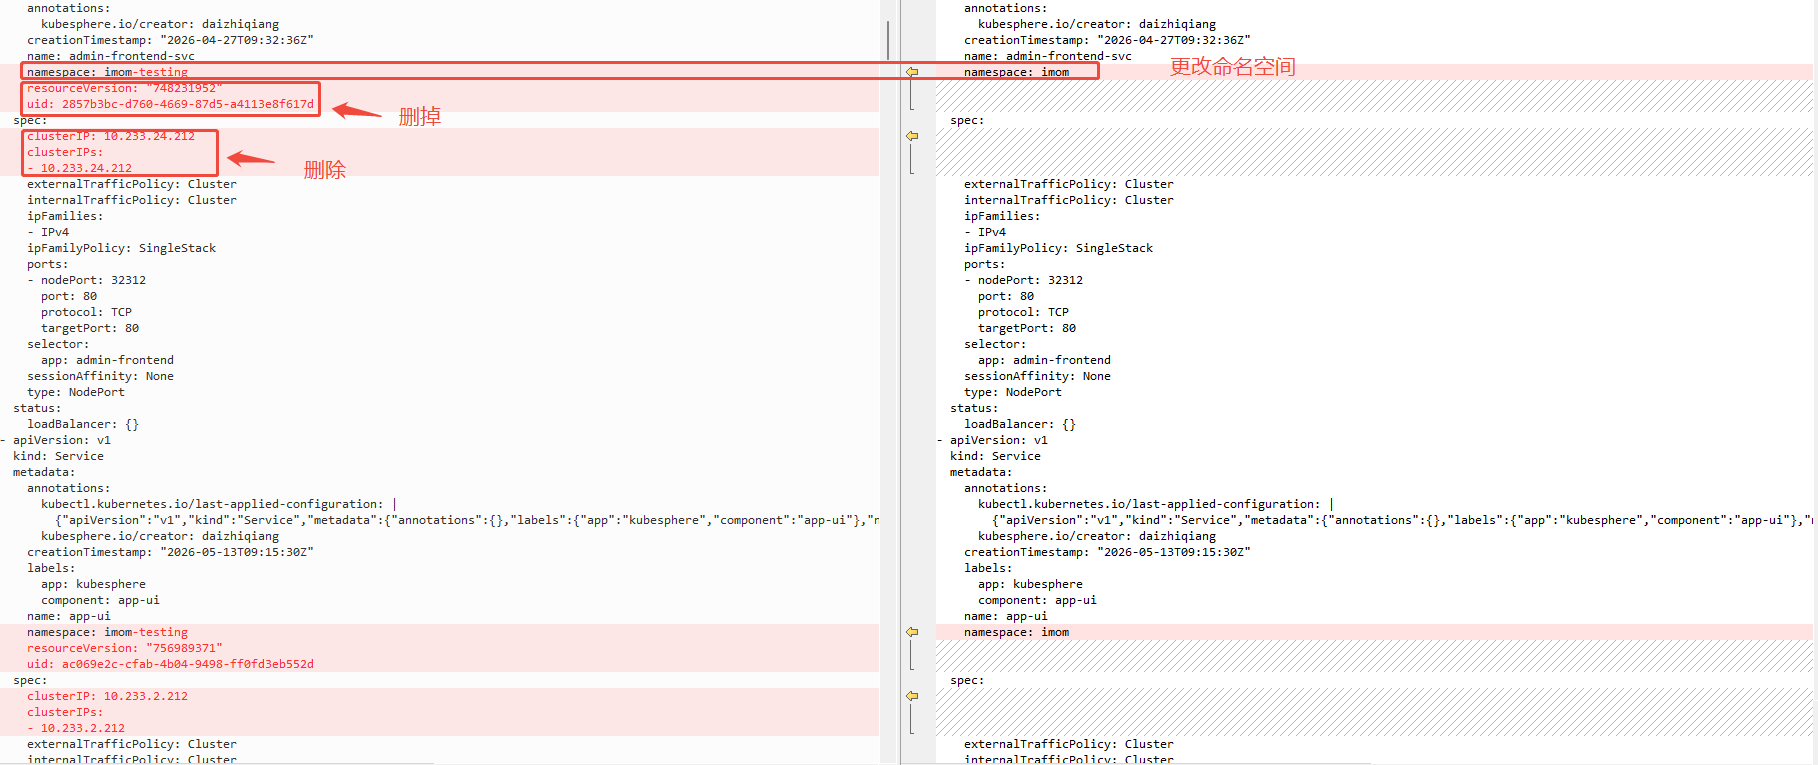
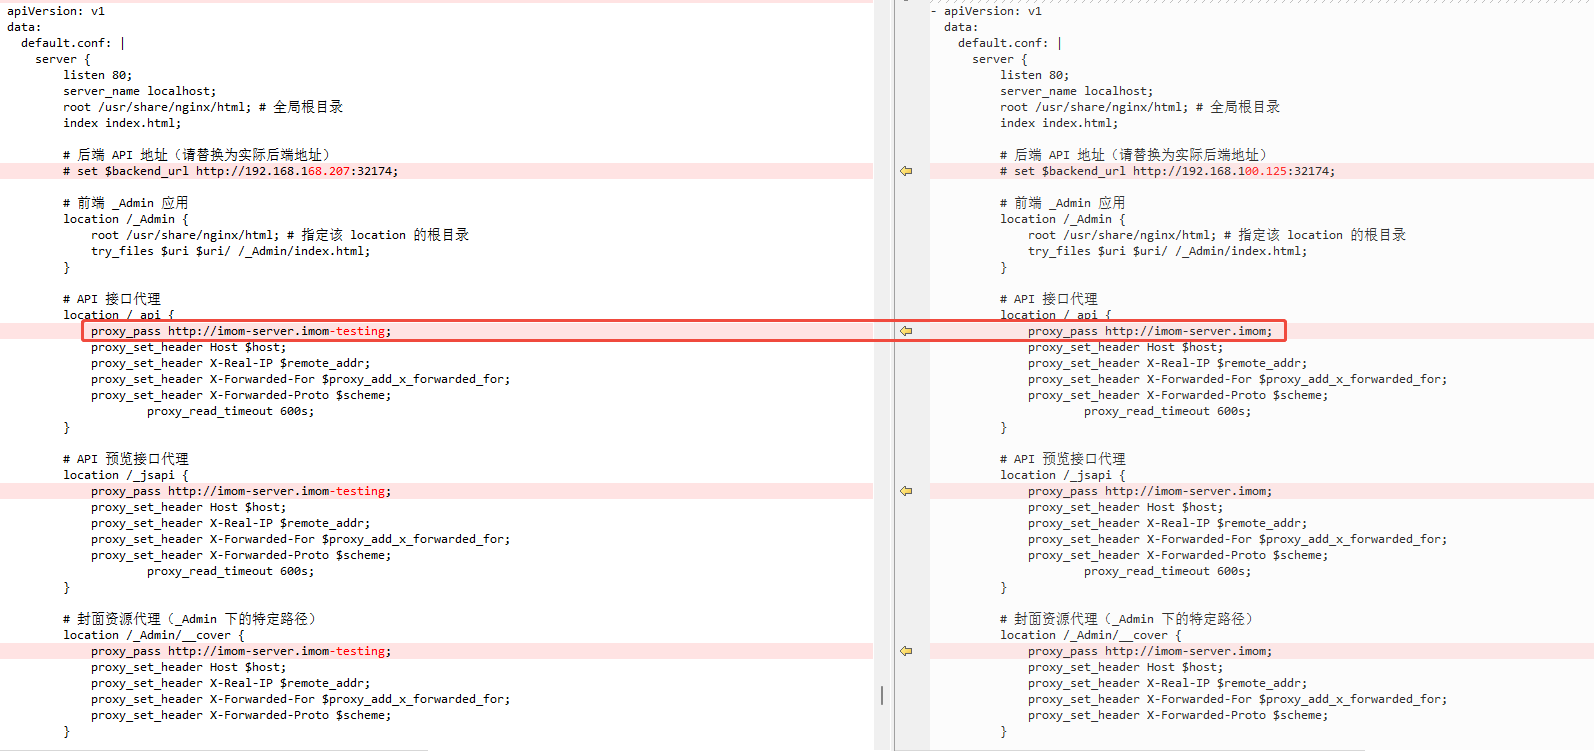
按以下的步骤修改导出的imom-cms.yaml:
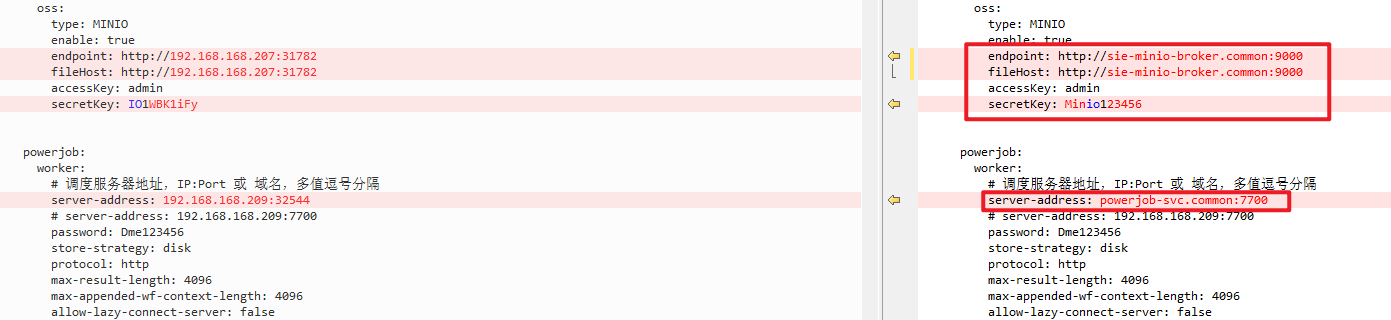
- 手工更改redis, minio, powerjob 的连接信息;


从imom-deployments.yaml 文件,导出所有的镜像文件:
cat imom-deployments.yaml | grep 'image:'
列表如下:
        - image: 192.168.168.207:30002/private/admin-frontend:v11
          image: 192.168.168.207:30002/imom/imom-gateway:master-20260109.16
          image: 192.168.168.207:30002/private/app-ui:20260819.110
          image: 192.168.168.207:30002/private/imom-dcollab:v0.0.2
          image: swr.cn-north-4.myhuaweicloud.com/ddn-k8s/docker.io/filebrowser/filebrowser:v2.31.0
          image: 192.168.168.207:30002/imom/imom-les-ui-react-test:20260825.1054
          image: 192.168.168.207:30002/imom/imom-mes-ui-react-test:20260825.1049
          image: 192.168.168.207:30002/imom/imom-mpm-ui-react-test:20260825.1053
          image: 192.168.168.207:30002/imom/imom-qms-ui-react-test:20260825.1051
          image: 192.168.168.207:30002/imom/imom-sys-ui-react-test:20260825.1052
          image: 192.168.168.207:30002/private/imom-flow:dev-20260716.274
          image: 192.168.168.207:30002/private/imom-kernel:dev-20260630.265
          image: 192.168.168.207:30002/imom/imom-les-ui-test:20260825.559
          image: 192.168.168.207:30002/imom/imom-mdm-ui-react-test:20260825.1050
          image: 192.168.168.207:30002/imom-release/imom-mes-public:20260313.0-release
          image: 192.168.168.207:30002/imom/imom-mes-ui-dev:20260715.1369
          image: 192.168.168.207:30002/imom/imom-mpm-ui-test:20260820.535
        - image: 192.168.168.207:30002/public/nginx:latest
          image: 192.168.168.207:30002/imom/imom-public-ui-dev:20260731.450
          image: 192.168.168.207:30002/imom/imom-qms-ui-test:20260825.558
          image: 192.168.168.207:30002/imom/imom-server:test-20260825.578
          image: 192.168.168.207:30002/imom/imom-skyworth-aps-ui:v0.0.3
          image: 192.168.168.207:30002/imom/imom-spc:test-20260721.3
          image: 192.168.168.207:30002/private/skyworth-aps-biz:v0.0.2
          image: 192.168.168.207:30002/private/imom-smt:dev-20260407.692
按 docker save {镜像地址} -o 文件名.tar 的模版,生成离线镜像文件,如下所示:
docker save 192.168.168.207:30002/private/admin-frontend:v11 -o admin-frontend_v11.tar
docker save 192.168.168.207:30002/imom/imom-gateway:master-20260109.16 -o imom-gateway_master-20260109.16.tar
docker save 192.168.168.207:30002/private/app-ui:20260819.110 -o app-ui_20260819.110.tar
docker save 192.168.168.207:30002/private/imom-dcollab:v0.0.2 -o imom-dcollab_v0.0.2.tar
docker save swr.cn-north-4.myhuaweicloud.com/ddn-k8s/docker.io/filebrowser/filebrowser:v2.31.0 -o filebrowser_v2.31.0.tar
docker save 192.168.168.207:30002/imom/imom-les-ui-react-test:20260825.1054 -o imom-les-ui-react-test_20260825.1054.tar
docker save 192.168.168.207:30002/imom/imom-mes-ui-react-test:20260825.1049 -o imom-mes-ui-react-test_20260825.1049.tar
docker save 192.168.168.207:30002/imom/imom-mpm-ui-react-test:20260825.1053 -o imom-mpm-ui-react-test_20260825.1053.tar
docker save 192.168.168.207:30002/imom/imom-qms-ui-react-test:20260825.1051 -o imom-qms-ui-react-test_20260825.1051.tar
docker save 192.168.168.207:30002/imom/imom-sys-ui-react-test:20260825.1052 -o imom-sys-ui-react-test_20260825.1052.tar
docker save 192.168.168.207:30002/private/imom-flow:dev-20260716.274 -o imom-flow_dev-20260716.274.tar
docker save 192.168.168.207:30002/private/imom-kernel:dev-20260630.265 -o imom-kernel_dev-20260630.265.tar
docker save 192.168.168.207:30002/imom/imom-les-ui-test:20260825.559 -o imom-les-ui-test_20260825.559.tar
docker save 192.168.168.207:30002/imom/imom-mdm-ui-react-test:20260825.1050 -o imom-mdm-ui-react-test_20260825.1050.tar
docker save 192.168.168.207:30002/imom-release/imom-mes-public:20260313.0-release -o imom-mes-public_20260313.0-release.tar
docker save 192.168.168.207:30002/imom/imom-mes-ui-dev:20260715.1369 -o imom-mes-ui-dev_20260715.1369.tar
docker save 192.168.168.207:30002/imom/imom-mpm-ui-test:20260820.535 -o imom-mpm-ui-test_20260820.535.tar
docker save 192.168.168.207:30002/public/nginx:latest -o nginx_latest.tar
docker save 192.168.168.207:30002/imom/imom-public-ui-dev:20260731.450 -o imom-public-ui-dev_20260731.450.tar
docker save 192.168.168.207:30002/imom/imom-qms-ui-test:20260825.558 -o imom-qms-ui-test_20260825.558.tar
docker save 192.168.168.207:30002/imom/imom-server:test-20260825.578 -o imom-server_test-20260825.578.tar
docker save 192.168.168.207:30002/imom/imom-skyworth-aps-ui:v0.0.3 -o imom-skyworth-aps-ui_v0.0.3.tar
docker save 192.168.168.207:30002/imom/imom-spc:test-20260721.3 -o imom-spc_test-20260721.3.tar
docker save 192.168.168.207:30002/private/skyworth-aps-biz:v0.0.2 -o skyworth-aps-biz_v0.0.2.tar
docker save 192.168.168.207:30002/private/imom-smt:dev-20260407.692 -o imom-smt_dev-20260407.692.tar
把以下生成的离线镜像文件,放置在部署服务器的/root/ansible_root/images 目录下:

在/root/ansible_root/images 目录下, 新建push_images.sh 脚本:
#!/bin/bash
set -e

# 更改为当前镜像仓库地址:
export ANSIBLE_DOCKER_REGISTRY_ADDRESS="192.168.8.91:5000"
CURRENT_PATH=`pwd`
K8S_ASSETS_PATH=(
    "${CURRENT_PATH}"
)

# 使用示例
# load_and_push_image  redis_8.0.2-debian-12-r4.tar  192.168.168.207:30002
load_and_push_image() {
    # 参数1: 镜像tar文件地址
    local IMAGE_TAR_PATH="$1"
    # 参数2: 镜像仓库地址
    local TARGET_REGISTRY="$2"

    # 检查是否提供了两个参数
    if [[ -z "$IMAGE_TAR_PATH" ]] || [[ -z "$TARGET_REGISTRY" ]]; then
        echo "Usage: load_and_push_image <image_tar_path> <target_registry>"
        return 1
    fi

    # 加载镜像
    echo "Loading image from $IMAGE_TAR_PATH..."
    load_result=`docker load -i "$IMAGE_TAR_PATH"`
    old_image_id=`echo ${load_result} | awk '{print $3}'`
    # 计算左斜杆数量
    count=$(echo -n "${load_result}" | tr -cd '/' | wc -c)
    if [[ "${count}" == "1" ]];then
      image_name=$(echo "${load_result}" | cut -d'/' -f1- )
    else
      image_name=$(echo "${load_result}" | cut -d'/' -f2- )
    fi
    # 构建新的镜像名称
    NEW_IMAGE_NAME="${TARGET_REGISTRY}/${image_name}"

    # 给镜像打上新标签
    echo "Tagging image as $NEW_IMAGE_NAME"
    docker tag "$old_image_id" "$NEW_IMAGE_NAME"

    # 推送镜像到目标仓库
    echo "Pushing image to $NEW_IMAGE_NAME"
    docker push "$NEW_IMAGE_NAME"

    echo "Image has been pushed successfully to $NEW_IMAGE_NAME"
}


# 检查 docker 是否存在, 否则退出
if which docker > /dev/null 2>&1; then
    echo "Docker 客户端已经安装"
else
    echo "Docker 未找到,请确保 Docker 已正确安装。"
    exit 1
fi

echo "install k8s images with docker"
for dir in "${K8S_ASSETS_PATH[@]}"; do
    echo "scan dir: $dir"
    # for file in $(ls "$dir" | sort -V); do
    for file in $(ls "$dir" | grep -E '\.(tar\.gz|tar)$' | sort -V); do
      fileFullPath="${dir}/${file}"
      echo "Processing: ${fileFullPath}"
      load_and_push_image ${fileFullPath} ${ANSIBLE_DOCKER_REGISTRY_ADDRESS}
    done
done

cd ${CURRENT_PATH}
执行以下的命令导入镜像:
chmod 755 push_images.sh
./push_images.sh
根据imom-server的minio, powerjob 的连接信息,分别创建minio的bucket和powerjob 的应用:
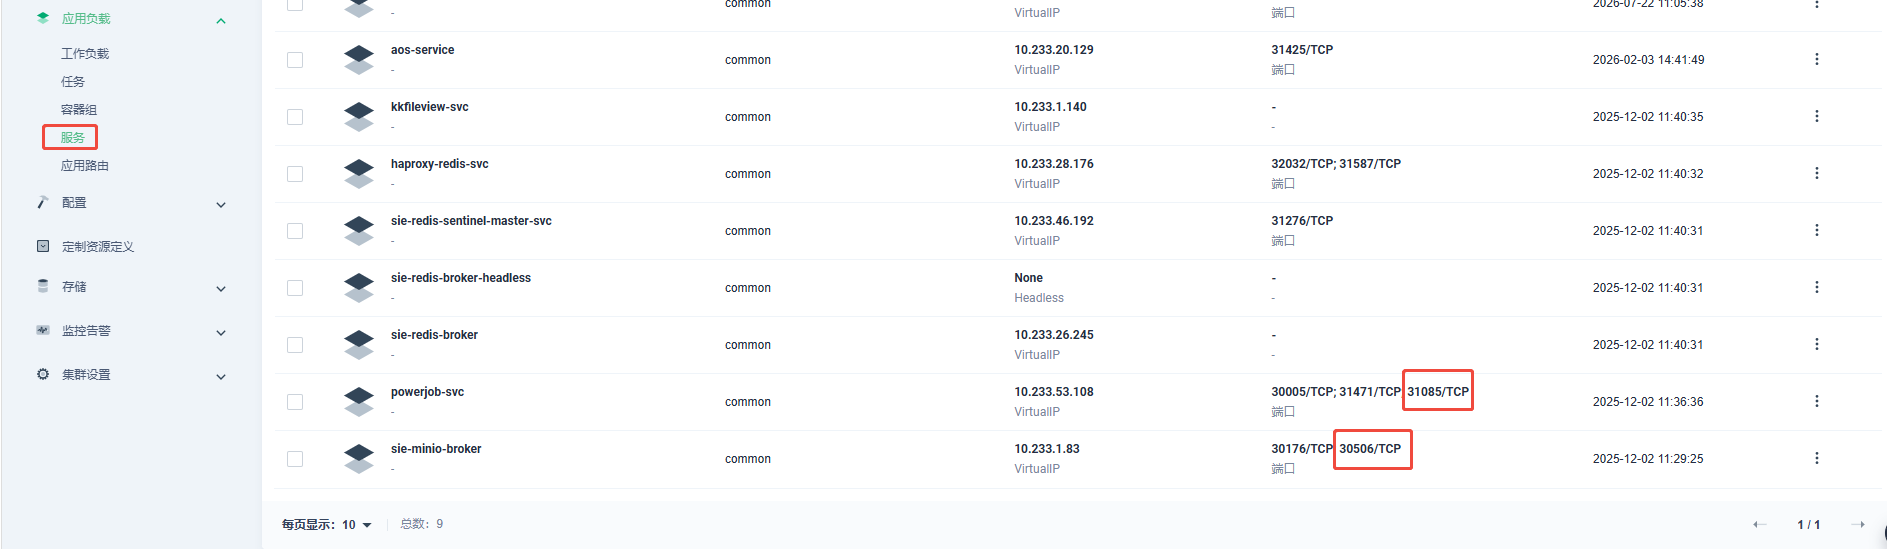
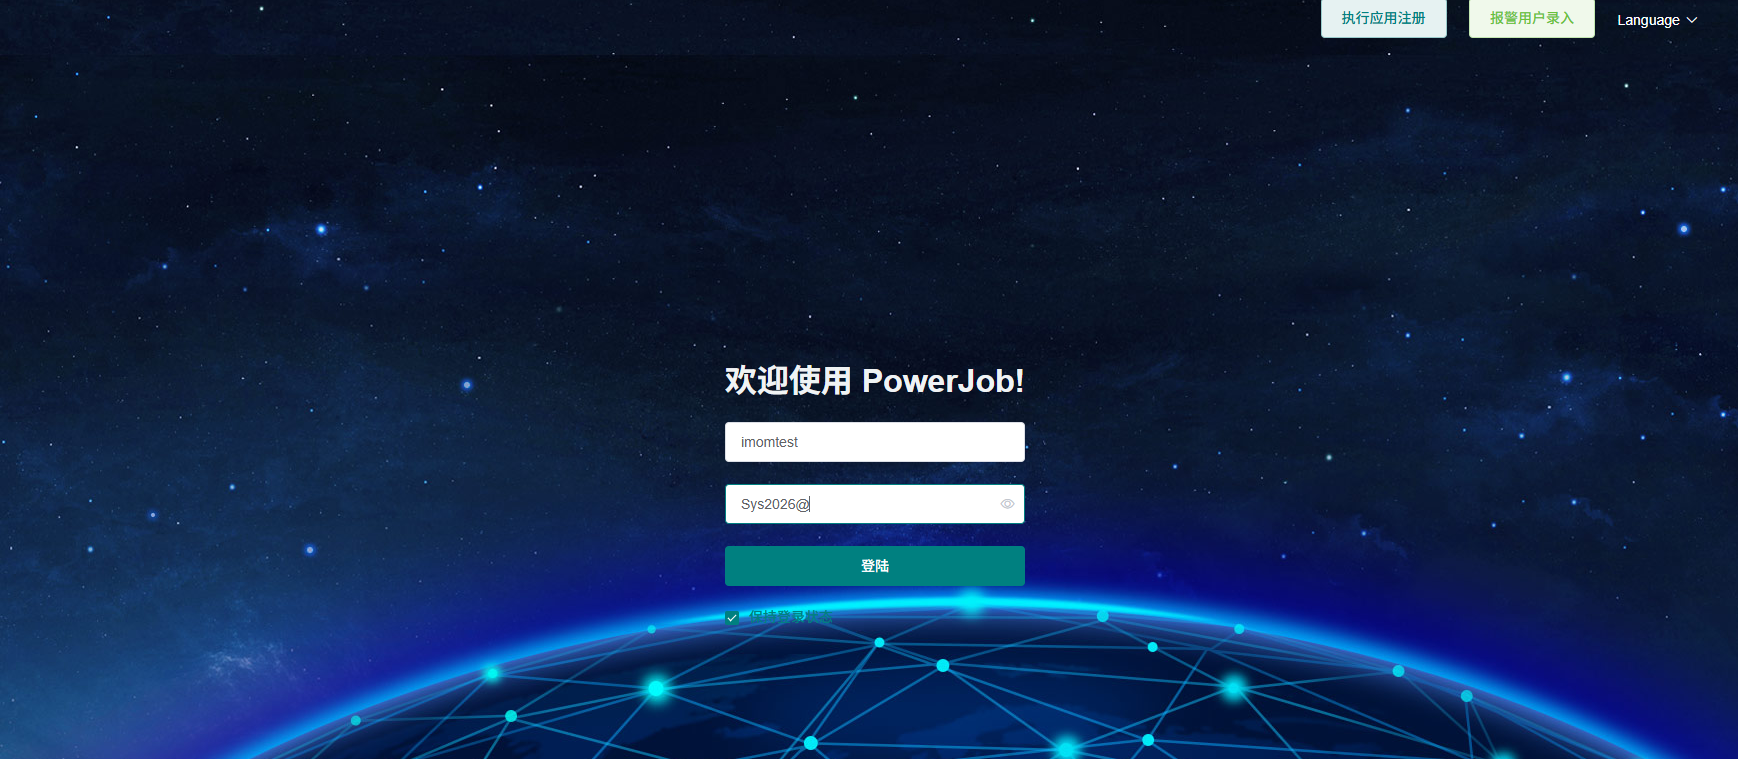
使用 http://{MASTER_IP}:{查看到NODEPORT}, 这里是http://192.168.1.1:31085, 进入powerjob管理页面, 根据imom-server 的powerjob 连接信息,注册应用 imomtest/Sys2026@
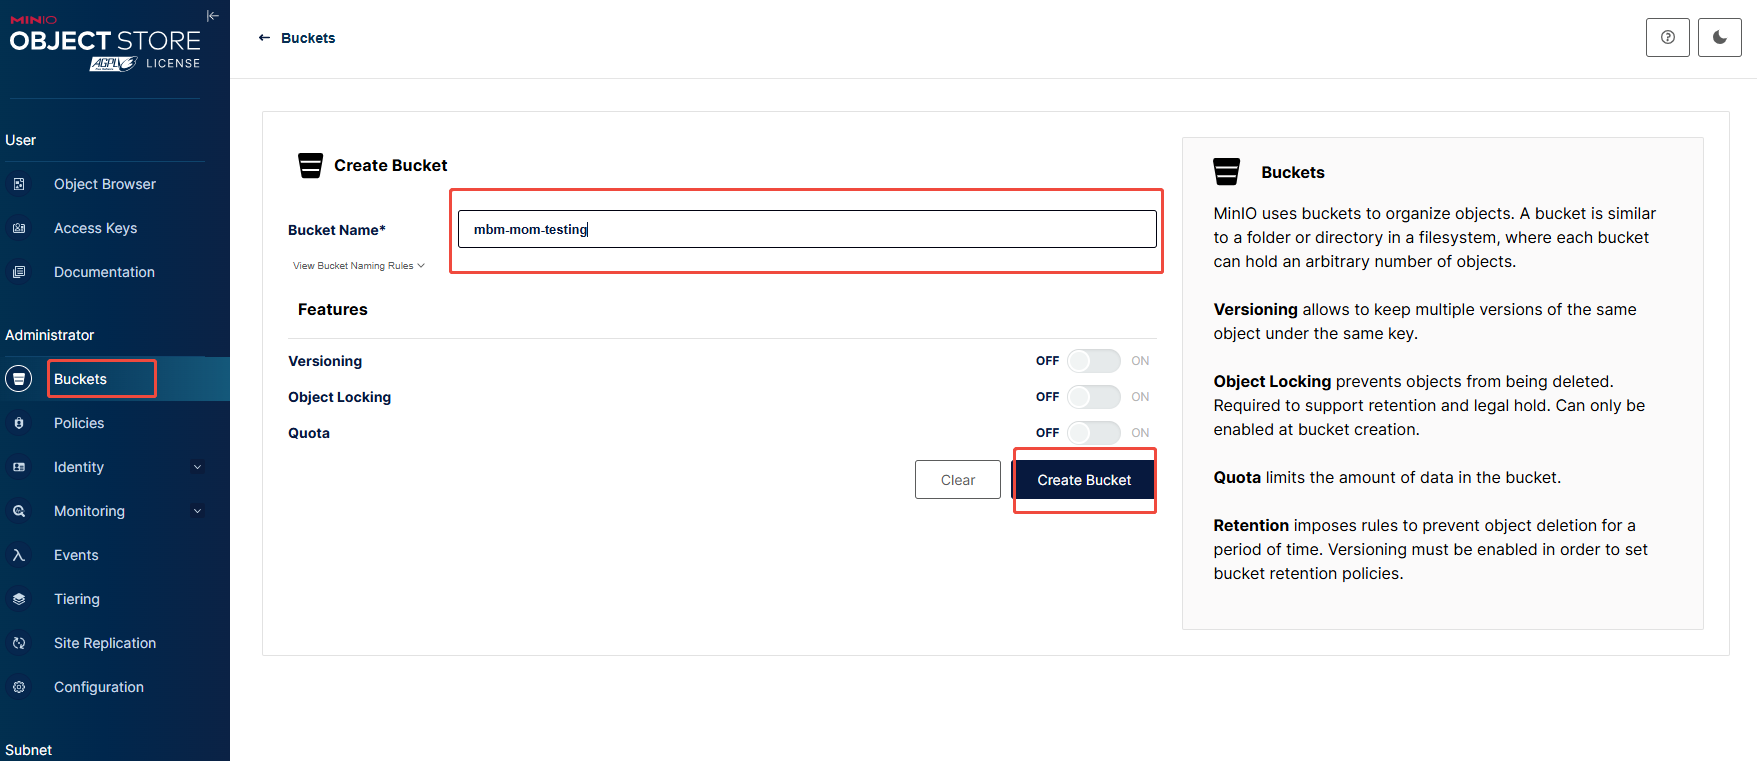
使用 http://{MASTER_IP}:{查看到NODEPORT}, 这里是http://192.168.1.1:30506, 进入minio管理页面, 根据imom-server 的minio 连接信息,创建bucket: mbm-mom-testing
以下的操作在K8s集群管理服务器1 (192.168.1.1) 上执行:
将上个步骤修改好的imom-deployments.yaml , imom-svcs.yaml, imom-cms.yaml 放置在/root 目录下,执行以下的步骤创建imom应用:
kubectl apply -f imom-deployments.yaml
kubectl apply -f imom-svcs.yaml
kubectl apply -f imom-cms.yaml
使用以下的命令导出测试环境imom-server的连接库为imom_prod20260713_ok.sql:
mysqldump -uroot -p --no-data -h192.168.1.5 -P3306 imom_dev > imom_prod20260713_ok.sql
登录数据库服务器(192.168.1.5), 使用以下的命令导入imom-server的初始化数据:
mysql -uroot -p输入密码
DROP DATABASE imom_prod;
CREATE DATABASE IF NOT EXISTS `imom_prod` CHARACTER SET utf8mb4 COLLATE UTF8MB4_GENERAL_CI;
source /root/imom_prod20260713_ok.sql;
从测试k8s服务器nfs服务器的 /var/data/nfs/imom-testing-filebrowser-imom-server-pvc-pvc-4910a4e7-068d-4006-9a74-4941981ab45e 目录生成rootPath8 压缩包:
cd /data/nfs/imom-testing-filebrowser-imom-server-pvc-pvc-4910a4e7-068d-4006-9a74-4941981ab45e
tar -cvzf  rootPath8.tar.gz  rootPath8
更换目标nfs服务器上imom-server 上PVC 的rootPath8目录内容为rootPath8.tar.gz 里的内容:
cd /var/data/nfs
# 查看imom-server 的PVC目录名称
ls -hl | grep imom-server
cd {imom-server 的PVC目录名称}
mv rootPath8 rootPath8_bak
mv /root/rootPath8.tar.gz .
tar -xvf rootPath8.tar.gz
之后重启 imom_dev 工作负载, 观察输出日志无异常
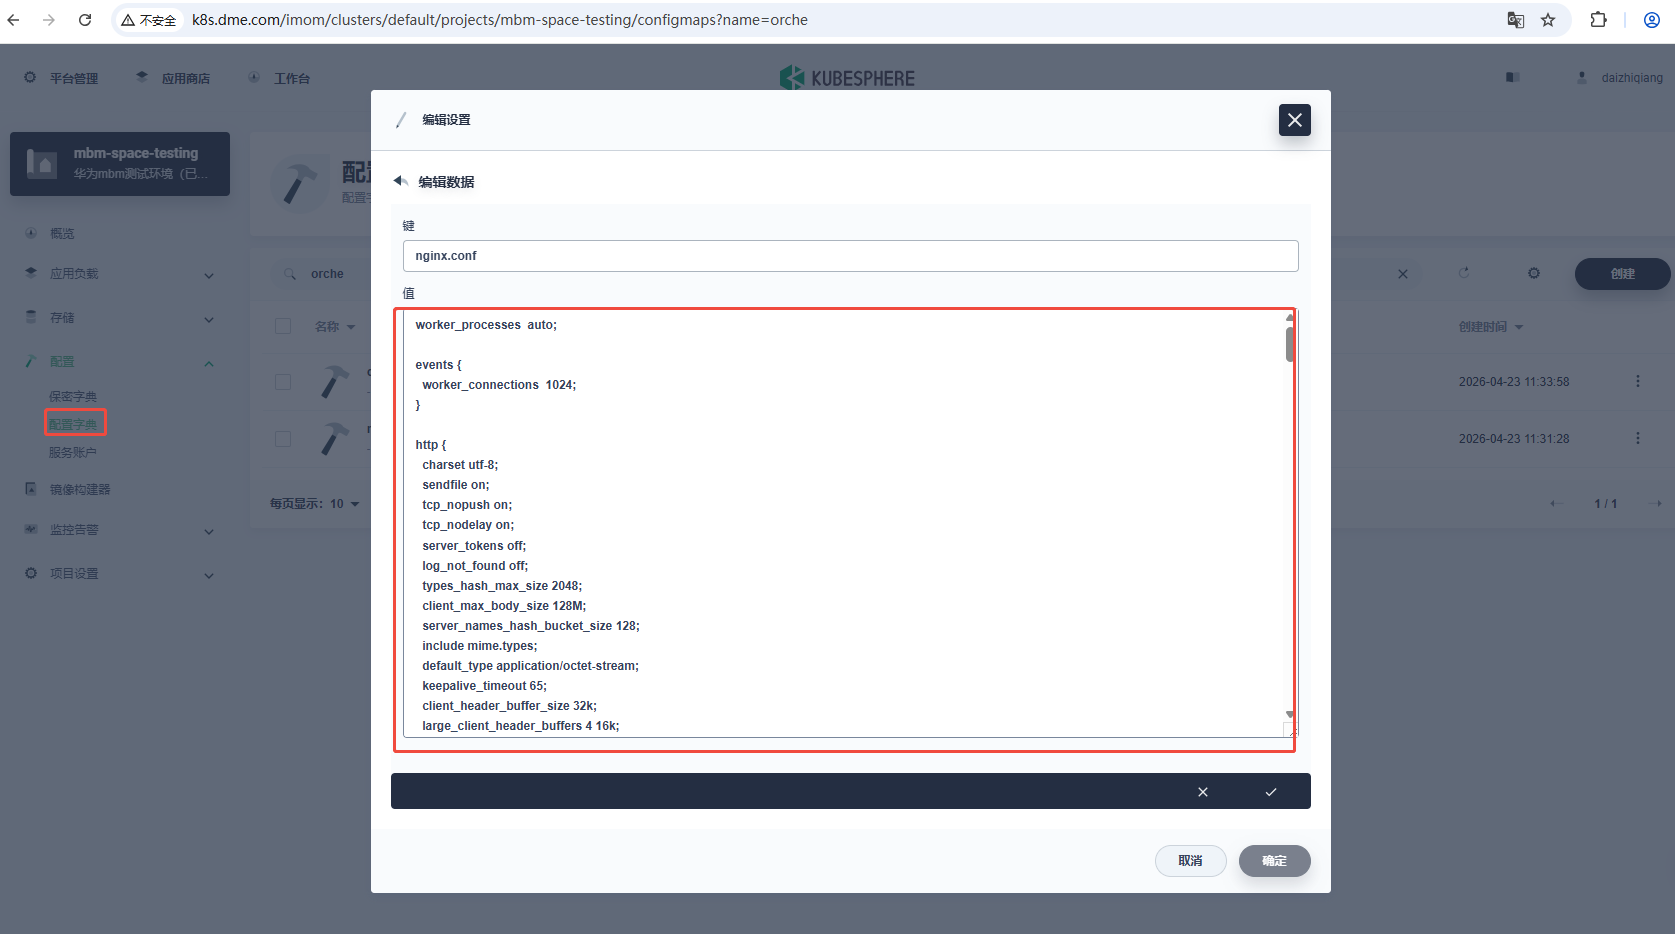
更新华为mbm平台orche-nginx转发配置:
从测试环境k8s mbm 命名空间下的orche-web-nginx-config,拷贝出 nginx.conf 内容 到正式环境的对应地方,覆盖原来的内容,如图所示:
之后重启 mbm-orche-web 工作负载, 观察输出日志无异常
5.2 观察imom,mbm, common的工作负载启动情况
- 查看工作负载的事件;
- 查看工作负载的日志,确保无异常;